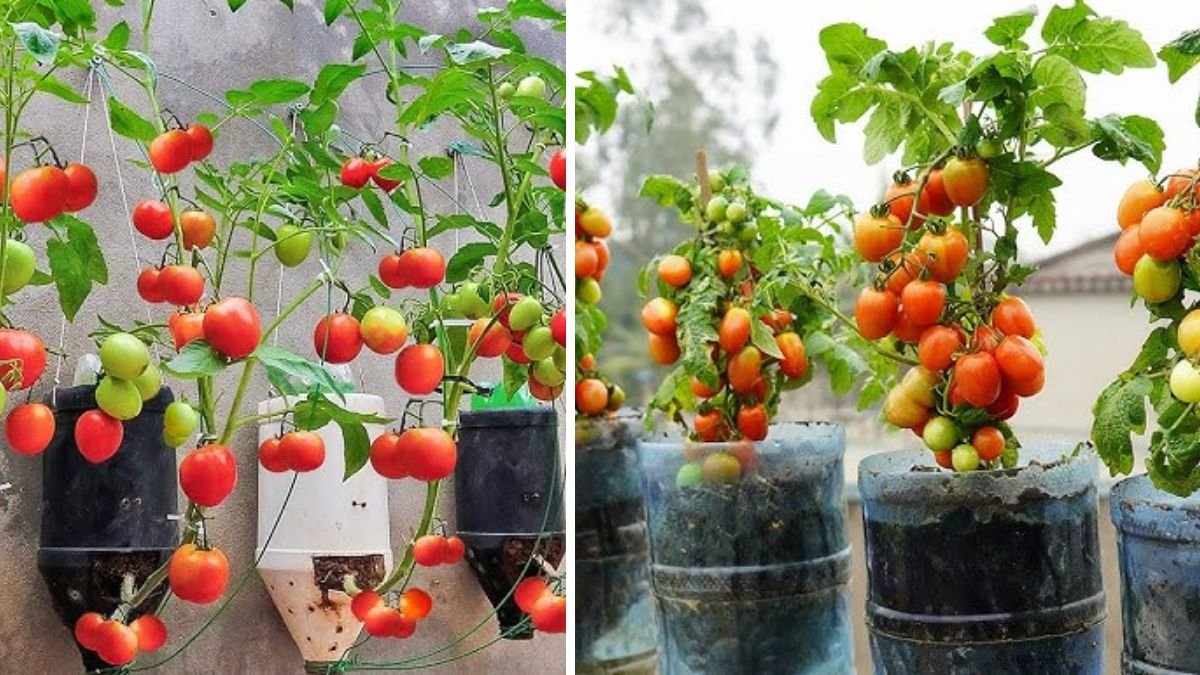
Growing tomatoes can be one of the most rewarding experiences for any gardener, whether you’re working with a spacious backyard or limited balcony space. Using plastic bottles for this purpose is an innovative and resourceful way to cultivate tomatoes. This method not only saves space but also offers a sustainable approach by repurposing plastic waste. Let’s explore the easy steps to successfully grow delicious tomatoes in plastic bottles, along with some frequently asked questions to help you along the way.
1. Why Use Plastic Bottles for Growing Tomatoes?
Using plastic bottles for growing tomatoes provides several advantages:
Latest Posts
- With Just 1 Bottle of Water How I Was Shocked by What Happened When Growing Vegetables
- Maximize Your Home Garden with the Hanging Pea Sprout Growing Model – Space-Saving, High-Yield, and Easy-to-Manage Vertical Gardening Solution
- Just Water – The Secret to Growing Plump, White Peanut Sprouts Right at Home: A Step-by-Step Guide for Beginners
- Growing Zucchini at Home in a Container: How to Cultivate Large, Long Fruits with a 1-to-72 Day Step-by-Step Diary for Maximum Yield
- Grow Long Beans on the Terrace in Used Recycling Baskets: The Ultimate Guide to Easy, Space-Saving, and High-Yield Terrace Gardening
- How to Grow Tons of Long Beans Easily Without a Garden – A Complete Guide to Growing Healthy Yardlong Beans Without Fertilizers or Pesticides
- Easy Long Bean Growing Trick – No Garden, No Fertilizer, No Pesticide
- Grow Bitter Melon in Bottles — Harvest So Big You Can’t Eat It All! The Ultimate Guide to Bottle Gardening for Maximum Yields
- Growing Garlic Made Easy: No Soil, Fast Results – The Ultimate Guide to Growing Fresh Garlic Indoors Without Traditional Soil
- Wall-Mounted Hydroponic Watermelon System: Grow Large, Juicy, and Delicious Watermelons at Home with Minimal Space and Maximum Yield
- Space-Saving: Ideal for small spaces, balconies, or patios.
- Sustainability: Recycling plastic bottles helps reduce environmental waste.
- Controlled Environment: The bottles create a micro-environment that can help in regulating moisture.
- Mobility: You can easily move the bottles to optimize sunlight exposure.
2. Materials Needed
Before you start planting, gather the following materials:
- Plastic Bottles: 1-2-liter bottles work best for small varieties; larger varieties may benefit from bigger bottles.
- Soil: Use a good-quality potting mix for optimal growth.
- Tomato Seeds or Seedlings: Choose varieties suited for container gardening, like cherry tomatoes or patio varieties.
- Scissors or Utility Knife: For cutting the bottles.
- Drill or Nail: To make drainage holes.
- Fertilizer: A balanced fertilizer will help provide necessary nutrients.
- Watering Can: For consistent watering.

3. Preparing the Plastic Bottles
3.1 Clean the Bottles
Start by thoroughly cleaning the bottles. Remove any labels and wash them with soap and water to eliminate any residue. Rinsing with water is essential to ensure that no soap remains.
3.2 Cut the Bottles
Using scissors or a utility knife, cut the plastic bottles in half. The top half will serve as the planting container, while the bottom half can collect excess water. For larger bottles, you can make slits instead of cutting them completely, allowing easy access for watering and tending.
3.3 Create Drainage Holes
To prevent root rot, it’s crucial to create drainage holes in the bottom part of the bottle. You can use a drill or a nail to poke several small holes.
3.4 Assemble the Bottles
Place the top half of the cut bottle into the bottom half. This design will help collect excess water while allowing roots to grow downwards.
4. Planting the Tomatoes
4.1 Add Soil
Fill the top half of the bottle with potting soil, leaving about an inch of space at the top. This will provide enough room for the seeds or seedlings.

4.2 Planting Seeds or Seedlings
- Seeds: Plant 2-3 seeds about half an inch deep into the soil, then cover them lightly.
- Seedlings: Make a small hole in the soil and gently place the seedling, ensuring the root ball is covered while still allowing some stem to show above the soil.
4.3 Watering
Water the soil lightly after planting. Ensure that it is moist but not waterlogged. Over-watering can lead to root rot.
5. Providing Optimal Conditions
5.1 Sunlight
Tomatoes love sunlight! Ensure your bottles are placed in a location where they can receive at least 6-8 hours of sunlight daily. A windowsill, balcony, or patio is perfect.
5.2 Temperature
Tomatoes thrive in temperatures of 70°F to 85°F (21°C to 29°C). If you live in an area with colder nights, consider bringing your bottles indoors or using cloches to retain heat.
5.3 Fertilization
Every 4-6 weeks, apply a balanced fertilizer according to the package instructions. This will nourish your plants and promote healthy growth.
6. Watering the Plants

6.1 Consistent Watering
Keep the soil consistently moist, especially during the growing season. During hot summer months, you may need to water daily. Use the drainage bottle to check if excess water is accumulating.
6.2 Avoiding Over-Watering
Be cautious with watering. Signs of over-watering include yellowing leaves and wilting stems. If you notice these symptoms, reduce watering frequency.
7. Supporting the Plants
As tomato plants grow, they may need support, especially varieties that produce larger fruits. You can use stakes or small cages to provide structural support. Secure the plants gently to avoid damaging them.
8. Pest and Disease Management
Monitor your plants regularly for signs of pests or diseases:
- Common Pests: Aphids, spider mites, and whiteflies.
- Common Diseases: Blight and blossom end rot.
To manage these issues, you can use organic pest control methods or neem oil. Removing affected leaves and ensuring proper air circulation can also help.
9. Harvesting the Tomatoes
Once your tomato plants start producing fruit, watch for ripening. Harvest tomatoes when they reach their full color and are firm to the touch. Gently twist or cut the fruit to avoid damaging the plant.

10. Tips for Success
- Choose the Right Varieties: Opt for smaller varieties if you’re limited on space.
- Rotate Crops: To prevent soil depletion, consider rotating crops for each growing season.
- Companion Planting: Plant herbs like basil nearby to enhance flavor and deter pests.
FAQs
1. Can I use any type of plastic bottle?
Yes, any plastic bottle can be used, but larger sizes (like 2-liter soda bottles) work best for tomato plants. Avoid bottles that contain harmful chemicals (number 3, 6, and 7 recycling codes) and opt for those marked with recycling codes 1 and 2.
2. How often should I water my tomato plants in bottles?
Watering frequency depends on the weather and the size of your plants. Generally, check the soil moisture daily. If the top inch feels dry, it’s time to water.
3. What type of soil should I use?
A high-quality potting mix or a soilless mixture works best for tomato plants. Look for options that retain moisture while providing good drainage.
4. How do I fertilize my tomato plants?
Use a balanced fertilizer every 4-6 weeks during the growing season. Follow the instructions on the product label for application rates.

5. Can I grow other vegetables in plastic bottles?
Yes, many other plants, such as peppers, herbs, and leafy greens, can also be grown using the plastic bottle method. Just ensure they have enough space for their root systems.
6. How do I prevent pests in my garden?
Regular monitoring for pests, using row covers, and applying organic treatments like neem oil can help keep pests at bay. Companion planting can also be advantageous.
7. Can I grow tomatoes indoors using this method?
Absolutely! Just make sure that your indoor space receives enough sunlight. Consider using grow lights for supplemental lighting during the shorter days of winter.
8. What should I do if my tomatoes are not ripening?
If your tomatoes are not ripening, it could be due to insufficient sunlight or cooling temperatures. Try moving them to a sunnier spot and ensure they receive warmth; you can also prune back some foliage to improve air circulation.
Growing tomatoes in plastic bottles is not only a fun and creative project but also a practical way to enjoy fresh produce with limited space. By following these steps and addressing common concerns through FAQs, you can become a successful tomato gardener, producing delicious fruits that enhance your meals and bring joy throughout the growing season. Happy gardening!