Growing vegetables can be a rewarding experience, but it can also be frustrating when your plants underperform despite your best efforts. What if you could dramatically improve the growth, size, flavor, and health of your garden vegetables with just one bottle of water? That sounds almost too good to be true, but when I tried a simple, unconventional watering technique using a single bottle of water per plant, the results completely shocked me — and transformed the way I garden forever.
In this article, I’ll take you on my journey from confusion to astonishment as I explore why this method works so well, how to set it up step by step, what benefits you can expect, and how you can adapt it to your own garden — whether you have a backyard, balcony, patio, or even just a few pots indoors.
The Problem: Traditional Watering Isn’t Always Enough
For years, I watered my vegetables the way most gardeners do — with a watering can or hose a few times a week. But despite watering regularly, my plants often showed signs of stress: wilted leaves during hot afternoons, uneven growth, and small yields. I asked myself:
- Was I watering too much?
- Too little?
- At the wrong times of day?
- Or was something deeper going on with the soil and roots?
After researching and experimenting, I realized something important: plants don’t just need water — they need steady availability of water directly to the root zone, not shallow or inconsistent watering on the surface. This insight led me to try a method that sounded almost too simple: give each plant just one bottle of water, delivered in a slow, controlled way.
What happened next surprised me.
Latest Posts
- Maximize Your Home Garden with the Hanging Pea Sprout Growing Model – Space-Saving, High-Yield, and Easy-to-Manage Vertical Gardening Solution
- Just Water – The Secret to Growing Plump, White Peanut Sprouts Right at Home: A Step-by-Step Guide for Beginners
- Growing Zucchini at Home in a Container: How to Cultivate Large, Long Fruits with a 1-to-72 Day Step-by-Step Diary for Maximum Yield
- Grow Long Beans on the Terrace in Used Recycling Baskets: The Ultimate Guide to Easy, Space-Saving, and High-Yield Terrace Gardening
- How to Grow Tons of Long Beans Easily Without a Garden – A Complete Guide to Growing Healthy Yardlong Beans Without Fertilizers or Pesticides
- Easy Long Bean Growing Trick – No Garden, No Fertilizer, No Pesticide
- Grow Bitter Melon in Bottles — Harvest So Big You Can’t Eat It All! The Ultimate Guide to Bottle Gardening for Maximum Yields
- Growing Garlic Made Easy: No Soil, Fast Results – The Ultimate Guide to Growing Fresh Garlic Indoors Without Traditional Soil
- Wall-Mounted Hydroponic Watermelon System: Grow Large, Juicy, and Delicious Watermelons at Home with Minimal Space and Maximum Yield
- Growing Napa Cabbage the Wrong Way? 99% Make This Mistake – 5 Essential Fixes at
The Breakthrough: One Bottle of Water, Big Results
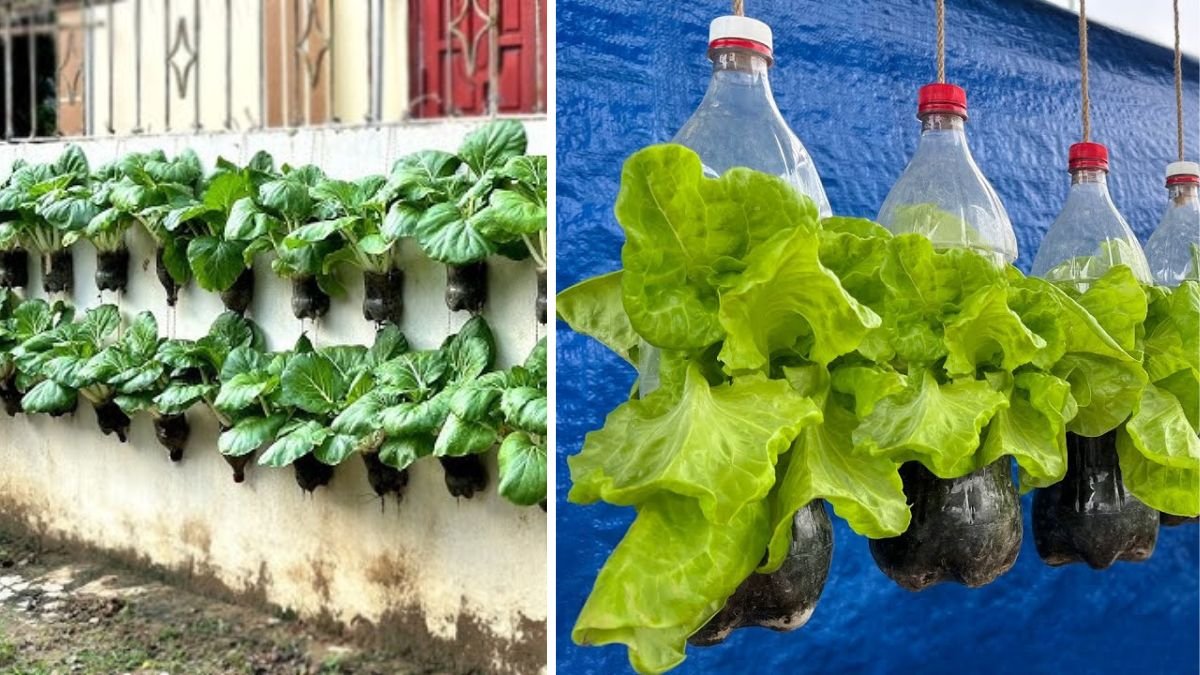
Here’s what I did: for each vegetable plant, I used a single plastic bottle — the kind you’d normally throw away — and turned it into a slow‑release watering system. Instead of dumping water on the soil surface, I let the bottle slowly deliver its water directly to the roots over several days.
The results were remarkable. Plants watered this way grew:

- Lusher foliage
- Stronger stems
- More blossoms
- Larger and juicier fruits and vegetables
- Better resistance to heat and drought
And all of this with only one bottle of water per plant per cycle!
Here’s Why It Works
To understand why this simple method yields such good results, here are the gardening fundamentals at play:
1. Roots Need Consistent Moisture — Not Flooding
- When soil dries and then gets flushed with water, roots experience stress.
- A slow, steady water source keeps moisture consistent around the roots.
2. Water Should Reach Deep, Not Just Wet the Surface
- Traditional watering wets only the top inch or two of soil.
- But plant roots reach deeper, and they thrive when moisture is available at root depth.
3. Slow Watering Encourages Stronger Roots
- When water is slow and predictable, roots grow outward and downward to access it.
- This leads to healthier plants that can better handle heat, wind, and pests.
4. No More Water Waste
- A bottle delivers exactly what the plant can use.
- There’s no overflow, runoff, or evaporation from watering the surface, which is common in traditional watering.
Step‑by‑Step: How to Use Just One Bottle of Water Per Plant
This method is easy and inexpensive. Here’s exactly how I set it up:

Materials You’ll Need
- Clean plastic bottles (500 ml–2 liters, depending on your plant size)
- A small nail or thin tool to make tiny holes in the lid
- Twine, stakes, or support frame (optional)
- Water (you can mix in a mild fertilizer if you like)
Step 1 — Prepare the Bottle
Clean the bottle and lid thoroughly. Using a small nail or tool, make several tiny holes in the bottle cap. These holes should be very small — just enough to allow water to slowly drip out.
Step 2 — Fill With Water
Fill the bottle with fresh water. You can also add a weak solution of compost tea or organic fertilizer if your soil needs nutrients.
Step 3 — Invert and Place
Turn the bottle upside down and gently push the cap into the soil about 10–15 centimeters (4–6 inches) from the base of the plant. This placement ensures water reaches the root zone without touching the stem directly.
If the plant is larger (like tomatoes or squash), you can stake the bottle or tie it to a support so it hangs just above the soil.
Step 4 — Let It Work
The bottle will slowly release water over several days — often 3–5 days depending on the temperature, soil type, and plant needs.
Every few days, check the bottle and refill it when water level is low. You’ll soon get a feel for how often your plants drink.
Plants That Thrive With This Method
I used this technique on a variety of vegetables, and almost all responded wonderfully. Some of the best performers included:

- Tomatoes — larger, juicier fruits with fewer splits
- Peppers — more pepper clusters and stronger plants
- Cucumbers — crisp, abundant harvests
- Leafy greens (lettuce, kale, spinach) — deep green leaves with less bolting
- Eggplants — shiny, plump fruits
Even root crops like carrots and radishes benefited, producing more tender roots with bolder flavor.
A Surprising Benefit: Less Disease and Stress
One of the most unexpected positives was how much less disease I saw in my garden:
- Fewer fungal spots on leaves
- Less wilt during heatwaves
- Reduced pest damage
- Better overall plant vigor
I realized that when plants are not stressed by dry spells or by erratic watering, they naturally resist pests and disease better.
Common Mistakes and How to Avoid Them
No method works perfectly without a bit of care. Here are pitfalls I learned to avoid:
Bottles Without Holes
If the holes are too large, water dumps out too fast. If there are no holes, water never comes out. Tiny, evenly spaced holes are key.
Bottles Too Far From Roots
Make sure the water releases close enough to roots to be useful, but not so close that it floods the stem.
Refilling Too Soon
Let the soil and plant tell you when more water is needed. Check soil moisture before refilling.

Tips for Even Better Results
To get the most from this method, consider these tips:
Mulch Around Plants: Mulch keeps soil cooler and reduces evaporation, so each bottle lasts longer.
Use Compost: Rich soil breeds healthier plants that make better use of every drop.
Adjust for Weather: In hot, dry spells, refill more often; in cool weather, bottles may last longer.
Pair With Fertilizer: Occasionally adding a mild nutrient solution in the bottle can boost yields.
What This Taught Me About Gardening
My experiment with one bottle of water taught me something important: gardening doesn’t have to be complicated or wasteful to be productive. Often, plants just need the right conditions — steady moisture, good soil, and consistent care — rather than lots of water or fancy tools.
This method also reminds us that innovation in gardening doesn’t always require expensive gadgets. Sometimes, the simplest ideas — like repurposing a bottle — can make the biggest difference.
Final Thoughts: Try It for Yourself
If you’re tired of guessing when to water, watching plants struggle, or wasting water with inefficient irrigation — this method is worth trying. Whether you’re a beginner gardener or someone with years of experience, the “one bottle of water” approach can:
- Save water
- Improve plant health
- Boost vegetable yields
- Reduce stress for both you and your plants
I was truly surprised by how much better my vegetables grew with just one bottle of water — and I believe you’ll be surprised too.
So grab a few bottles, set them up in your garden, and get ready to be amazed by what your vegetables can do with a little creativity and one simple solution.