Introduction
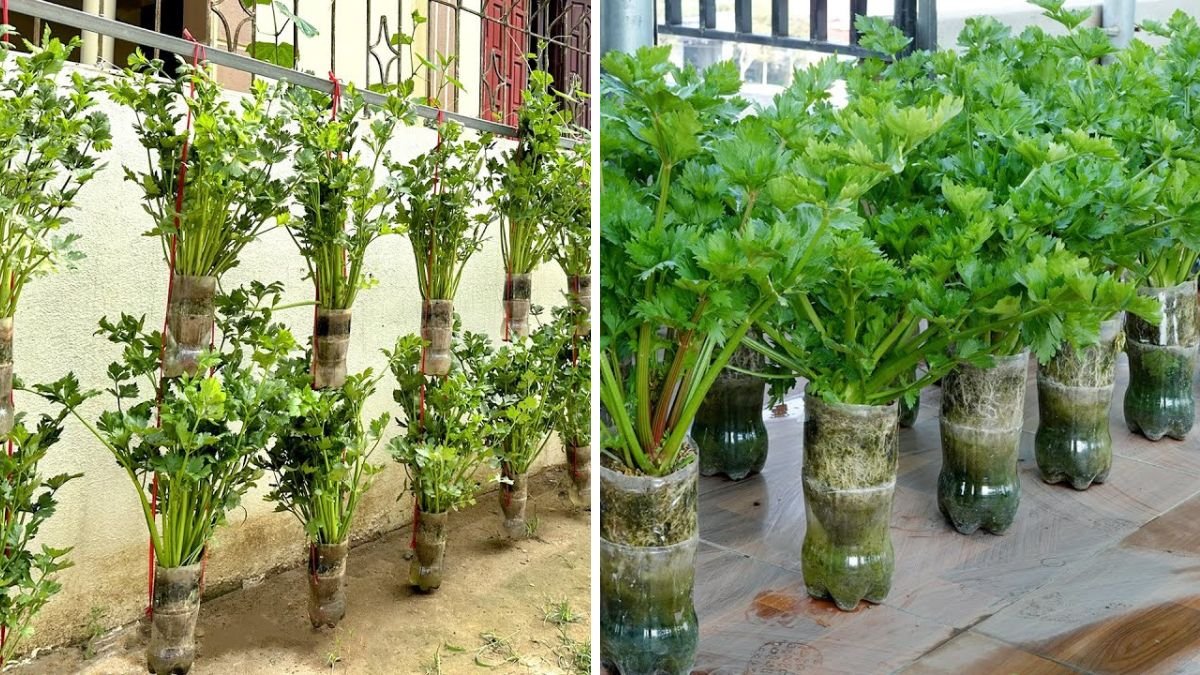
Urban gardening has taken a creative turn in recent years, with city dwellers and small-space gardeners discovering innovative ways to grow fresh vegetables without a traditional garden plot. One of the most exciting trends is using recycled plastic bottles to create vertical wall gardens, transforming otherwise wasted materials into productive planters. This approach is ideal for growing celery, a nutrient-rich, high-yield leafy vegetable that thrives in moist, fertile soil.
By repurposing plastic and utilizing vertical spaces, gardeners can cultivate a mountain of celery, even in tight balconies, patios, or walls. Beyond space efficiency, this method supports sustainable living and reduces plastic waste. In this guide, we’ll explore [FOCUS KEYWORD], from materials and setup to care tips, harvest strategies, and expert references.
Why Vertical Gardening with Recycled Plastic Works
Maximizing Space
Vertical gardening allows plants to grow up instead of out, making it perfect for small urban areas. By mounting planters on walls or fences, you can transform unused vertical surfaces into productive vegetable gardens. Celery, with its compact root system and consistent moisture needs, is especially well-suited for this method.
Sustainability
Plastic waste is a growing global concern. Repurposing bottles as planters not only reduces environmental impact but also turns waste into a functional resource. This method embodies the principles of zero-waste living, where everyday items get a second life.
Cost-Effectiveness
Instead of purchasing expensive vertical planters, gardeners can use recycled bottles, containers, or other household plastics, minimizing costs while creating a sturdy and effective growing structure.
Latest Posts
- With Just 1 Bottle of Water How I Was Shocked by What Happened When Growing Vegetables
- Maximize Your Home Garden with the Hanging Pea Sprout Growing Model – Space-Saving, High-Yield, and Easy-to-Manage Vertical Gardening Solution
- Just Water – The Secret to Growing Plump, White Peanut Sprouts Right at Home: A Step-by-Step Guide for Beginners
- Growing Zucchini at Home in a Container: How to Cultivate Large, Long Fruits with a 1-to-72 Day Step-by-Step Diary for Maximum Yield
- Grow Long Beans on the Terrace in Used Recycling Baskets: The Ultimate Guide to Easy, Space-Saving, and High-Yield Terrace Gardening
- How to Grow Tons of Long Beans Easily Without a Garden – A Complete Guide to Growing Healthy Yardlong Beans Without Fertilizers or Pesticides
- Easy Long Bean Growing Trick – No Garden, No Fertilizer, No Pesticide
- Grow Bitter Melon in Bottles — Harvest So Big You Can’t Eat It All! The Ultimate Guide to Bottle Gardening for Maximum Yields
- Growing Garlic Made Easy: No Soil, Fast Results – The Ultimate Guide to Growing Fresh Garlic Indoors Without Traditional Soil
- Wall-Mounted Hydroponic Watermelon System: Grow Large, Juicy, and Delicious Watermelons at Home with Minimal Space and Maximum Yield

Materials Needed
To build a plastic bottle wall garden for celery, you’ll need:
- Clean plastic bottles (1–2 liters work best)
- Hooks, ropes, or wire mesh to secure bottles
- Potting mix (a combination of garden soil, compost, and cocopeat)
- Compost or organic fertilizer
- Scissors, knives, or drills for bottle preparation
Optional materials include wooden frames or pallets for added support, particularly if you plan to hang multiple rows of bottles.
Step 1: Preparing the Bottles
- Wash bottles thoroughly to remove labels and residues.
- Cut a rectangular opening on the side to serve as a planting pocket for celery seedlings.
- Drill small drainage holes at the bottom of each bottle to prevent waterlogging.
- Arrange bottles according to your wall layout, leaving at least 25–30 cm (10–12 inches) between each for adequate sunlight and air circulation.
This setup ensures proper root growth and prevents overcrowding, which is essential for high yields.
Step 2: Choosing the Right Wall
Celery thrives in partial to full sunlight. Select a wall that receives 4–6 hours of sunlight daily, ideally south- or east-facing for consistent warmth. Walls made of concrete, brick, or strong wooden fences are ideal for supporting the weight of multiple bottles filled with soil and plants.
If sunlight is limited, consider positioning the wall garden near reflective surfaces or installing a simple grow light for indoor setups.

Step 3: Installing Support
Secure the bottles using hooks, wires, ropes, or a combination of wooden frames and pallets. Options include:
- Vertical rope systems for a hanging display
- Wire mesh or lattice grids for a staggered layout
- Pallet backings to create modular rows
Ensure that each bottle is stable, with minimal sway, so roots stay undisturbed and water does not spill onto lower rows. A staggered ladder formation often works best, allowing sunlight to reach every plant.
Step 4: Filling Bottles with Soil
Use a light, well-draining soil mix to promote celery growth. A recommended mix includes:
- 50% garden soil or compost
- 30% cocopeat or peat moss for moisture retention
- 20% perlite or sand for aeration and drainage
Celery prefers moist but well-drained soil, so avoid compacting the soil. Adding a small gravel layer at the bottom can enhance drainage and prevent root rot.
Step 5: Planting Celery
You can grow celery in a wall garden using either:

- Seedlings or slips: Transplant healthy young celery plants into prepared bottles.
- Regenerating store-bought celery: Cut the base and place it in soil to sprout new roots.
Ensure seedlings are planted firmly but not buried too deep. Water immediately after planting to help roots establish.
Step 6: Watering and Maintenance
Watering is critical for vertical gardens because top-row planters dry faster than ground-level pots. Guidelines for consistent care:
- Water daily or as needed to keep soil moist but not soggy
- Use a drip system or bottle tops for slow, consistent irrigation
- Mulch with dried leaves or straw to retain moisture and reduce evaporation
Regular care prevents leaf drop, supports continuous growth, and encourages the plant to produce abundant stalks.
Step 7: Feeding Your Celery
Celery is a heavy feeder and requires regular nutrients for optimal growth:
- Use organic compost or liquid fertilizer every 2–3 weeks
- Apply balanced NPK fertilizers if the leaves start turning pale
- Avoid excessive nitrogen to prevent lush foliage at the expense of edible stalks
Proper feeding helps celery develop thick, tender stalks, maximizing both yield and quality.

Step 8: Pest and Disease Management
Even small vertical gardens can face pest problems. Watch for:
- Aphids, leaf miners, and small caterpillars
- Fungal infections caused by excess moisture
Preventive measures:
- Inspect leaves regularly and remove any damaged or infected parts
- Use natural remedies like neem oil sprays
- Ensure sufficient spacing and airflow between bottles
These steps reduce stress on plants and support uninterrupted growth.
Harvesting Celery
Celery grows continuously and can be harvested over several months if managed properly. Tips for harvesting:
- Harvest outer stalks first, allowing inner stalks to continue growing
- Use a clean knife or scissors to prevent damaging roots
- Regular harvesting encourages new growth and maximizes seasonal yield
With proper care, a well-designed plastic wall garden can produce a mountain of celery, sufficient for personal use or sharing with neighbors.

Tips for Success
- Succession Planting: Plant new seedlings every few weeks to maintain a continuous harvest.
- Monitor Sunlight: Rotate bottles if some are shaded.
- Consistent Moisture: Keep soil evenly moist; check top and bottom bottles.
- Supplement Nutrients: Replenish soil fertility regularly to sustain vigorous growth.
- Compact Layout: Celery doesn’t need large containers, making it ideal for vertical arrangements.
Benefits of This Method
- Eco-Friendly: Reuses plastic and reduces environmental impact.
- Space-Saving: Perfect for urban apartments, small balconies, or limited yard spaces.
- Cost-Effective: Minimal investment using recycled materials.
- High-Yield: Proper maintenance ensures a continuous, abundant harvest.
Authoritative Sources
For further guidance and inspiration, consult these resources:
- Times of India – DIY Vertical Gardens: Step-by-step recycled bottle vertical garden tips. (link)
- AgriFarming – Zero-Cost Gardening: Using plastic bottles for home vegetable gardens. (link)
- CriaFacil – Green DIY: Vertical gardening with recycled materials. (link)
- FlatGardening – Wall Garden Design: Tips for maximizing space and sunlight. (link)
Conclusion
Creating a vertical wall garden with recycled plastic is an ingenious, sustainable way to grow celery. By combining simple DIY techniques with proper planting, watering, and fertilization, gardeners can produce abundant, healthy celery even in limited spaces. This approach not only promotes urban greening but also contributes to a more sustainable lifestyle by reusing plastic waste.
Start with a few bottles and a sunny wall, and you can turn ordinary materials into a mountain of celery — a productive, eco-friendly solution for modern gardening.