Introduction: The Fascination of Caladium Growth
There’s something truly mesmerizing about watching a plant emerge from a dormant bulb, unfold vibrant foliage, and transform a space in just 70 days. Caladiums (Caladium spp.) are particularly enchanting because of their tropical, colorful leaves and dramatic growth pattern. A 70-day time-lapse captures this entire journey, giving gardeners a clear visual guide to the plant’s development.
Caladiums are native to tropical South America and thrive in warm, humid environments. Their bulbs, sometimes called tubers, remain dormant until conditions are ideal. Observing a 70-day time-lapse is not just visually stunning — it also teaches the precise care techniques needed to grow healthy, colorful foliage. Understanding these growth stages helps gardeners optimize soil, watering, lighting, and temperature conditions. (caladiumworld.com)
Understanding Caladium Bulbs
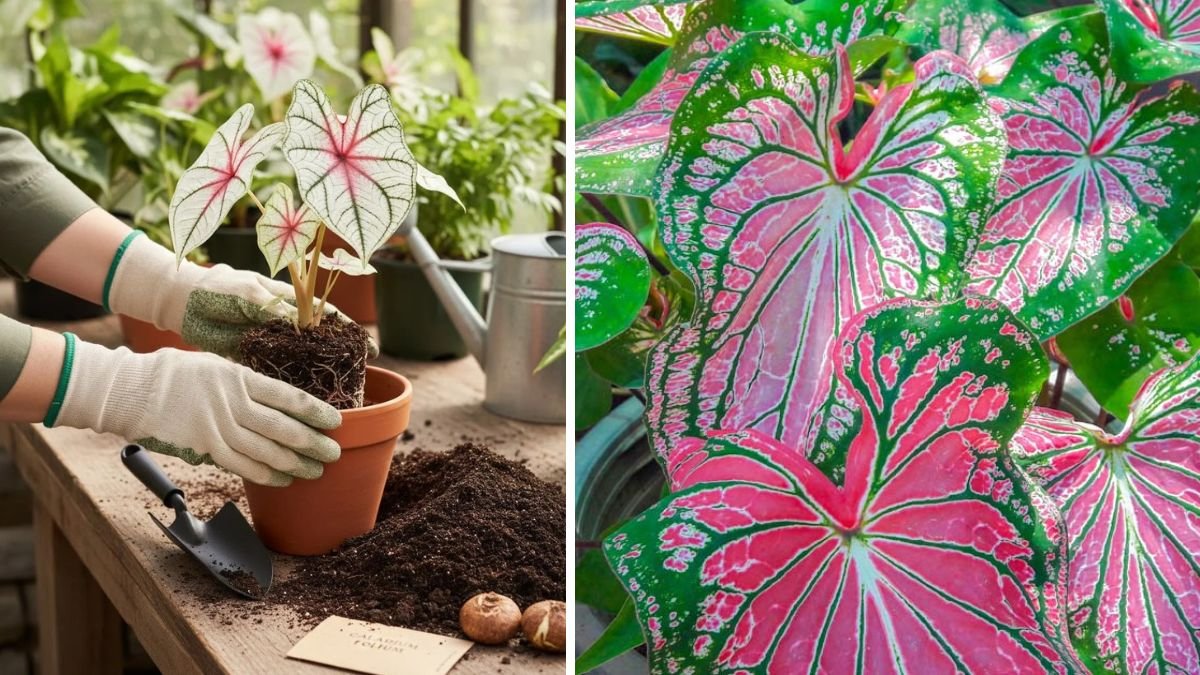
Caladium bulbs are specialized structures that store energy and nutrients to fuel leaf growth. They require:
- Warm soil: Ideal temperatures are above 70°F (21°C).
- Moist but well-drained soil: Excess water can cause rot.
- Indirect sunlight or partial shade: Too much direct sunlight can scorch leaves.
A healthy bulb can produce multiple leaves throughout the growing season, creating a lush, decorative plant suitable for beds, borders, or containers. (caladiumbulbs.com)

The 70-Day Time-Lapse Breakdown
A typical 70-day growth period for a caladium bulb can be divided into four stages:
Latest Posts
- With Just 1 Bottle of Water How I Was Shocked by What Happened When Growing Vegetables
- Maximize Your Home Garden with the Hanging Pea Sprout Growing Model – Space-Saving, High-Yield, and Easy-to-Manage Vertical Gardening Solution
- Just Water – The Secret to Growing Plump, White Peanut Sprouts Right at Home: A Step-by-Step Guide for Beginners
- Growing Zucchini at Home in a Container: How to Cultivate Large, Long Fruits with a 1-to-72 Day Step-by-Step Diary for Maximum Yield
- Grow Long Beans on the Terrace in Used Recycling Baskets: The Ultimate Guide to Easy, Space-Saving, and High-Yield Terrace Gardening
- How to Grow Tons of Long Beans Easily Without a Garden – A Complete Guide to Growing Healthy Yardlong Beans Without Fertilizers or Pesticides
- Easy Long Bean Growing Trick – No Garden, No Fertilizer, No Pesticide
- Grow Bitter Melon in Bottles — Harvest So Big You Can’t Eat It All! The Ultimate Guide to Bottle Gardening for Maximum Yields
- Growing Garlic Made Easy: No Soil, Fast Results – The Ultimate Guide to Growing Fresh Garlic Indoors Without Traditional Soil
- Wall-Mounted Hydroponic Watermelon System: Grow Large, Juicy, and Delicious Watermelons at Home with Minimal Space and Maximum Yield
- Days 1–14: Dormancy Breaks
Bulbs absorb water and nutrients, initiating root development. Warmth is critical at this stage; cool soil will delay sprouting. Roots begin to anchor the plant, preparing it for shoot emergence. (caladiumbulbs.com) - Days 15–30: Shoot Emergence
Small shoots break through the soil surface. Leaf primordia start to unfurl, and the plant establishes its first visible foliage. Consistent moisture and stable temperatures accelerate growth. (classiccaladiums.com) - Days 31–50: Leaf Expansion and Color Development
Leaves grow larger, and the signature colors and patterns of the cultivar emerge. Optimal partial shade ensures vivid coloration while preventing scorching. Fertilization with a balanced, low-nitrogen formula encourages healthy, strong leaves. (caladiumworld.com) - Days 51–70: Full Foliage and Maturity
The caladium reaches peak leaf size and vibrancy. This is when it becomes a centerpiece in garden beds or containers. Continued watering, fertilization, and protection from extreme sunlight maintain healthy foliage through the peak growing period. (caladiumbulbs.com)
A time-lapse video of these stages can be incredibly educational, showing the rapid transformation from a dormant bulb to a lush tropical plant. (youtube.com)
Choosing the Right Planting Time
Timing is critical for successful caladium growth. Plant bulbs outdoors only when:
- Night temperatures consistently exceed 65°F (18°C)
- Soil temperatures are 70°F (21°C) or higher
Planting too early in cooler soil delays growth and can cause bulbs to rot before sprouting. In colder climates, starting bulbs indoors in containers 6–8 weeks before the last frost ensures earlier, healthier growth. (planetagarden.com)

Planting Caladium Bulbs: Step-by-Step
Site Selection
Caladiums perform best in partial shade or filtered sunlight. Too much direct sun can fade leaf colors and damage foliage. (classiccaladiums.com)
Planting Depth
Dig a hole 1½–2 inches deep, with the eyes of the bulb facing up. Cover lightly with soil and water gently. (classiccaladiums.com)
Soil Preparation
Use rich, well-draining soil amended with peat moss or organic matter. Proper drainage prevents rot while maintaining moisture for sprouting. (caladiumbulbs.com)
Spacing
Leave 6–12 inches between bulbs, depending on the variety and mature leaf spread. Proper spacing improves airflow and reduces disease risk. (classiccaladiums.com)

Watering and Fertilizing
Caladium bulbs need consistent moisture, especially in the first weeks after planting. Avoid waterlogged conditions, which can cause rot.
Fertilize after shoots emerge with a balanced, low-nitrogen fertilizer every 4–6 weeks. Too much nitrogen encourages soft, weak growth that can collapse under the weight of the leaves. (nationalplantoftheyear.com)
Light and Temperature Needs
Caladiums are tropical plants, thriving in:
- Temperatures between 70–85°F (21–29°C)
- Partial shade or filtered sunlight to protect foliage
- High humidity, especially during peak growth
Cool temperatures below 60°F slow growth and may induce dormancy. Excessive direct sunlight can bleach leaves and reduce vibrant patterns. (homesteadgardener.com)

Dormancy and Winter Storage
At the end of the growing season, caladiums enter dormancy as temperatures drop. Leaves die back naturally, signaling the need for bulb storage:
- Dig up bulbs when foliage dies
- Dry bulbs with good air circulation
- Store in a warm, dry location (above 65°F) until next spring
Proper storage ensures the bulbs remain viable for the following year. (caladiums.com)
Troubleshooting Common Issues
- Slow sprouting: Often caused by cool soil or excessive moisture. Warmth and patience are key. (reddit.com)
- Yellowing leaves: Can result from underwatering, heat stress, or nutrient deficiency.
- Bulb rot: Caused by overly wet soil or poor drainage. Amend soil with organic matter and reduce water.
Why a 70-Day Time-Lapse Matters
Watching a 70-day time-lapse provides gardeners with:
- Insight into root emergence and leaf expansion
- Visualization of optimal growth rates under ideal conditions
- Understanding of color development and pattern formation
- A clear view of how environmental factors affect growth
It’s a powerful learning tool that guides planting schedules, watering routines, and fertilizer applications. (youtube.com)

Background Context: Caladiums’ Tropical Origins
Native to the tropical Americas, caladiums thrive in warm, humid conditions and require well-draining, nutrient-rich soils. Their tropical origin explains their sensitivity to cold and the need for careful handling of bulbs during planting and storage. Proper replication of these conditions ensures vibrant foliage and healthy growth. (caladiumbulbs.com)
Authoritative Sources
- Caladium Bulbs Planting & Care (caladiumbulbs.com)
- Classic Caladiums Planting Guide (classiccaladiums.com)
- National Plant of the Year – Growing Caladiums from Bulbs (nationalplantoftheyear.com)
- Suttons Gardening Hub – Caladium Bulbs (hub.suttons.co.uk)
Conclusion
Growing caladiums from bulbs and watching them develop over a 70-day time-lapse is both educational and rewarding. By providing warm soil, partial shade, consistent moisture, and balanced nutrients, you can witness dormant bulbs transform into vibrant, tropical foliage. Observing the growth stages helps gardeners refine techniques, anticipate problems, and enjoy the full beauty of caladium plants.
Time-lapse photography isn’t just for show — it’s a powerful tool for mastering [FOCUS KEYWORD] and achieving stunning garden results year after year.