Oleander (Nerium oleander) is a popular ornamental plant known for its beautiful flowers and hardy nature. It thrives in various conditions and is often found in gardens and landscapes around the world. Propagating oleander plants can be a rewarding experience, and one of the easiest and most effective methods is using aloe vera gel. This article will guide you through the propagation process step by step, highlighting the benefits of using aloe vera gel and addressing common questions.
Why Propagate Oleander?
Propagating oleander has several benefits:
Latest Posts
- With Just 1 Bottle of Water How I Was Shocked by What Happened When Growing Vegetables
- Maximize Your Home Garden with the Hanging Pea Sprout Growing Model – Space-Saving, High-Yield, and Easy-to-Manage Vertical Gardening Solution
- Just Water – The Secret to Growing Plump, White Peanut Sprouts Right at Home: A Step-by-Step Guide for Beginners
- Growing Zucchini at Home in a Container: How to Cultivate Large, Long Fruits with a 1-to-72 Day Step-by-Step Diary for Maximum Yield
- Grow Long Beans on the Terrace in Used Recycling Baskets: The Ultimate Guide to Easy, Space-Saving, and High-Yield Terrace Gardening
- How to Grow Tons of Long Beans Easily Without a Garden – A Complete Guide to Growing Healthy Yardlong Beans Without Fertilizers or Pesticides
- Easy Long Bean Growing Trick – No Garden, No Fertilizer, No Pesticide
- Grow Bitter Melon in Bottles — Harvest So Big You Can’t Eat It All! The Ultimate Guide to Bottle Gardening for Maximum Yields
- Growing Garlic Made Easy: No Soil, Fast Results – The Ultimate Guide to Growing Fresh Garlic Indoors Without Traditional Soil
- Wall-Mounted Hydroponic Watermelon System: Grow Large, Juicy, and Delicious Watermelons at Home with Minimal Space and Maximum Yield
- Cost-Effective: Instead of purchasing new plants, you can easily propagate from existing ones, saving money.
- Variety: If you have a specific cultivar you love, propagating allows you to maintain and extend that variety in your garden.
- Active Growth: Propagating during the growing season can lead to faster and more vigorous growth, allowing you to enjoy the flowers sooner.
Understanding Aloe Vera’s Role in Propagation
Aloe vera is renowned for its healing properties and has become popular in gardening as well. Its gel contains hormones that promote root growth, making it particularly useful for propagating plants. The enzymes and amino acids in aloe vera can help prevent rot and boost the plant’s overall health during the propagation process.
Materials Needed
Before we begin the propagation process, gather the following materials:
- Healthy Oleander Cuttings: Look for green, healthy stems about 6-8 inches long.
- Aloe Vera Leaf: Fresh aloe vera leaf from a well-established plant.
- Potting Mix: A well-draining potting mix or a mixture of peat and perlite.
- Containers: Small pots or trays for planting the cuttings.
- Water: To keep the potting mix moist but not soggy.
- Rooting Hormone (optional): While not necessary due to the aloe vera gel, some choose to use commercial rooting hormones as an extra measure.

Step-by-Step Guide to Propagate Oleander Using Aloe Vera Gel
Step 1: Take Cuttings
-
Select a Healthy Plant: Choose a mature oleander plant that hasn’t been treated with pesticides recently.
-
Cut the Stems: Using clean, sharp pruning shears, cut several 6-8 inch stems. Make your cuts just below a leaf node to encourage rooting.
-
Remove Lower Leaves: Strip the lower leaves on each cutting, leaving a few leaves at the top intact. This helps reduce moisture loss while increasing energy focus on root development.
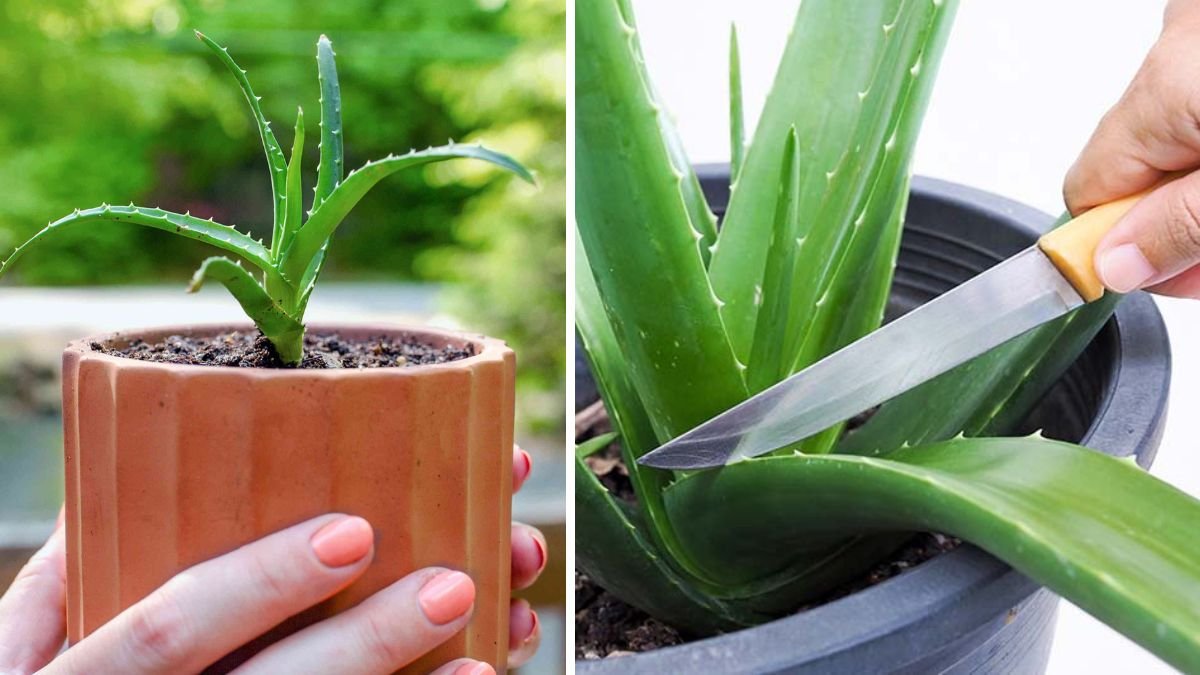
Step 2: Prepare Aloe Vera Gel
-
Cut the Aloe Vera Leaf: Use a sharp knife to cut a healthy leaf from your aloe vera plant.
-
Extract the Gel: Slice the leaf open lengthwise and scoop out the gel using a spoon.
-
Blend or Mash: Although you can use the gel as is, blending it can create a smoother consistency, making it easier to apply to the cuttings.

Step 3: Dip the Cuttings
-
Apply the Aloe Gel: Dip the cut ends of the oleander cuttings into the aloe vera gel. Ensure that the gel coats the cut surface thoroughly, as this is where the roots will emerge.
-
(Optional) Use Rooting Hormone: If desired, you can dip the gel-coated end into rooting hormone. This step can enhance rooting but is not necessary due to the aloe’s natural rooting properties.
Step 4: Plant the Cuttings
-
Prepare Containers: Fill your pots or trays with the well-draining potting mix. Water the mix lightly to ensure it’s moist but not soggy.
-
Insert Cuttings: Make a small hole in the potting mix and insert the cut end of the oleander cutting into the soil. Firmly press the soil around the cutting to stabilize it.
-
Space Them Out: If using a tray, ensure that the cuttings are spaced at least a few inches apart to allow for airflow.

Step 5: Create a Humid Environment
-
Cover with Plastic: To maintain humidity, you can cover the pots or trays with a clear plastic bag or a plastic dome.
-
Ensure Drainage: Make sure there are holes in the bottom of the pots to prevent excess water and rot.
-
Check Regularly: Lift the cover periodically to check for moisture levels and to allow fresh air circulation.
Step 6: Watering and Caring
-
Maintain Moisture: Keep the potting mix consistently moist but not waterlogged throughout the rooting process.
-
Provide Indirect Light: Place the containers in a location with bright, indirect sunlight. Avoid direct sunlight, which can scorch the cuttings.
-
Wait for Roots: Depending on the conditions, you may see roots developing within 3-6 weeks. You can gently tug on the cuttings to check for resistance, indicating root growth.
Step 7: Transplanting
-
Acclimate the Plants: Once the oleander cuttings have developed a strong root system, gradually acclimate them to outdoor conditions.
-
Transplant: Move them to larger pots or their permanent garden locations once acclimatized. Ensure they continue receiving adequate sunlight and watering.

Common Challenges and Solutions
-
Rotting Cuttings: Ensure that your cuttings are not sitting in water; too much moisture can lead to rotting. Use a well-draining potting mix.
-
Insufficient Rooting: If cuttings are not rooting well, check conditions such as humidity, moisture, and light.
-
Pest Infestation: Monitor regularly for pests and treat as necessary, preferably using organic methods.
FAQs
1. Can I propagate oleander in water instead of soil?
While it is possible to propagate oleander cuttings in water, using soil allows for stronger root development. If using water, ensure to change it regularly.
2. How long does it take for oleander cuttings to root?
Typically, oleander cuttings will root in about 3-6 weeks under optimal conditions.

3. Can I use store-bought aloe vera gel?
While fresh aloe vera gel is preferred due to its potency, store-bought gel can be used as long as it is pure and contains no additives.
4. Are oleander plants toxic?
Yes, all parts of the oleander plant are toxic if ingested, making it important to take precautions, especially around children and pets.
5. What is the best time to propagate oleander?
Late spring to early summer is the best time for propagation since the plant is in its active growth phase.
6. What are some signs that my cuttings are healthy?
Healthy cuttings will remain firm and green. If they appear wilted, blackened, or mushy, they may be dying or rotting.
Conclusion
Propagating oleander plants using aloe vera gel is not only easy but also an efficient way to expand your garden. The natural rooting compounds found in aloe vera enhance the chances of successful propagation. With patience and the right care, you can enjoy an abundance of beautiful oleander plants in your landscape. Whether as a decorative element in your garden or for practical landscaping, oleander is a resilient option that rewards gardeners with beauty and longevity.