Hibiscus plants are renowned for their vibrant flowers and lush foliage, making them a popular choice among gardeners and indoor plant enthusiasts alike. They bring a tropical feel to any space, which is why many people are eager to propagate them. While there are various methods for propagating hibiscus, one of the simplest and most accessible techniques is propagation in water. This article will guide you through the process step by step, providing tips for success and answering some frequently asked questions.
Understanding Hibiscus Plant Propagation
Propagation is the process of creating new plants from existing ones, and it can be achieved in several ways:
Latest Posts
- With Just 1 Bottle of Water How I Was Shocked by What Happened When Growing Vegetables
- Maximize Your Home Garden with the Hanging Pea Sprout Growing Model – Space-Saving, High-Yield, and Easy-to-Manage Vertical Gardening Solution
- Just Water – The Secret to Growing Plump, White Peanut Sprouts Right at Home: A Step-by-Step Guide for Beginners
- Growing Zucchini at Home in a Container: How to Cultivate Large, Long Fruits with a 1-to-72 Day Step-by-Step Diary for Maximum Yield
- Grow Long Beans on the Terrace in Used Recycling Baskets: The Ultimate Guide to Easy, Space-Saving, and High-Yield Terrace Gardening
- How to Grow Tons of Long Beans Easily Without a Garden – A Complete Guide to Growing Healthy Yardlong Beans Without Fertilizers or Pesticides
- Easy Long Bean Growing Trick – No Garden, No Fertilizer, No Pesticide
- Grow Bitter Melon in Bottles — Harvest So Big You Can’t Eat It All! The Ultimate Guide to Bottle Gardening for Maximum Yields
- Growing Garlic Made Easy: No Soil, Fast Results – The Ultimate Guide to Growing Fresh Garlic Indoors Without Traditional Soil
- Wall-Mounted Hydroponic Watermelon System: Grow Large, Juicy, and Delicious Watermelons at Home with Minimal Space and Maximum Yield
- Seeds: Growing plants from seeds is a traditional method but can be time-consuming and requires specific conditions.
- Cuttings: This is a more straightforward method where you cut a section of an existing plant and encourage it to root.
- Division: This involves separating a plant into multiple parts, each with its root system. However, this method is less applicable for hibiscus.
Hibiscus propagation through cuttings is considered the easiest method among gardeners. When done correctly, it can quickly yield healthy, new plants.
Why Propagate Hibiscus in Water?
- Simplicity: Propagation in water is straightforward, requiring minimal tools and materials.
- Observation: You can easily monitor the rooting process and identify when the cutting has developed a healthy root system.
- No Soil Mess: Propagating in water eliminates the mess associated with soil, making it ideal for indoor settings.

Step-by-Step Guide to Propagating Hibiscus in Water
Step 1: Selecting the Right Cutting
The first step is to choose a healthy parent hibiscus plant and select the right stem cutting. Here’s what to look for:
- Healthy Growth: Choose a stem that is healthy, firm, and free from pests or diseases.
- Length: A cutting of about 4-6 inches (10-15 cm) in length is ideal.
- Nodes: Ensure that the cutting has at least one node, which is a small bump where leaves grow. Nodes are crucial for root development.
Step 2: Preparing the Cutting
Preparation is key to successful water propagation. Here’s how to prepare your cutting:
- Make the Cut: Using clean, sharp scissors or pruning shears, cut the stem just below a node at a 45-degree angle. This angle increases the surface area for water absorption.
- Remove Lower Leaves: Strip off any leaves on the lower half of the cutting, as they may rot in water and hinder root development.
- Optional: Use Hormone Powder: Although not necessary, you might dip the cut end in rooting hormone to encourage faster root growth.
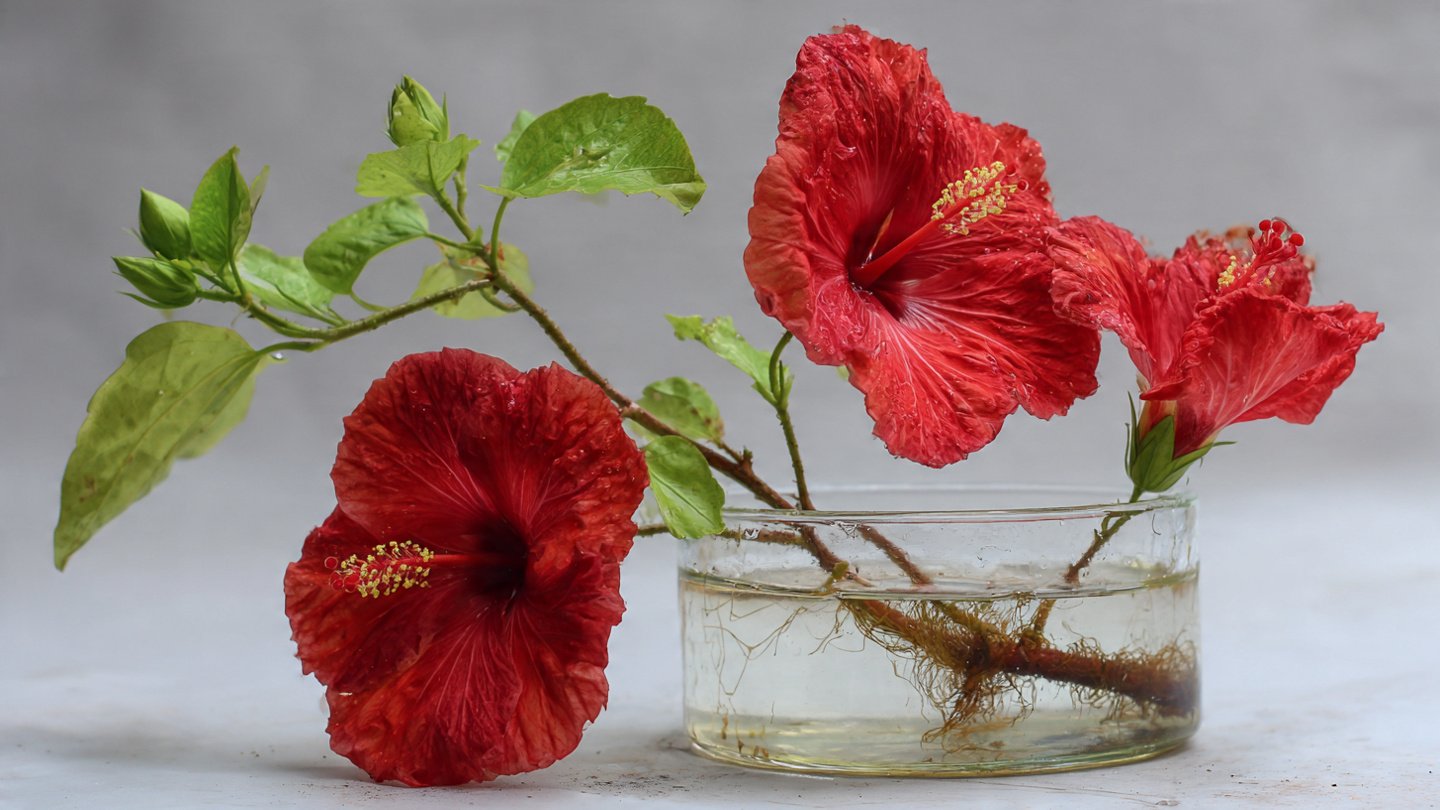
Step 3: Placing the Cutting in Water
Now that your cutting is ready, follow these steps for placement:

- Choose a Container: Select a transparent container (like a glass vase or jar) that allows you to monitor the rooting process.
- Add Water: Fill the container with room-temperature water, ensuring the nodes of the cutting are submerged while the stripped leaves stay above water.
Step 4: Caring for Your Cutting
Proper care will ensure successful rooting. Here are some tips:
- Light: Place the container in a location with bright, indirect sunlight. Too much direct sunlight can heat the water and harm the cutting, while too little light will slow down root development.
- Water Level: Change the water weekly to prevent stagnation and algae growth. Always ensure that the water level is sufficient to cover the nodes.
- Monitoring: Keep an eye on the cutting for any signs of rotting or mold. If any occur, remove the cutting, clean it, and replace it in fresh water.
Step 5: Waiting for Roots
Patience is essential. Depending on environmental conditions and plant health, roots may take anywhere from a few days to several weeks to develop. The common signs that roots are forming include:
- Formation of small roots emerging from the nodes.
- Increased leaf health and vigor.

Step 6: Transplanting to Soil
Once the roots are 2-3 inches (5-8 cm) long, it’s time to transplant your hibiscus cutting into soil.
- Choose the Right Pot: Select a container with drainage holes to prevent waterlogging.
- Prepare Potting Mix: Use a well-draining potting mix, such as a blend of potting soil, perlite, and peat moss.
- Transplant: Carefully remove the cutting from the water, avoiding damage to the roots. Plant it in the prepared potting mix, ensuring the roots are covered but the stem remains above the soil surface.
- Water: Water the soil gently, ensuring the plant is settled securely.
Maintenance for Your New Hibiscus Plant
Once transplanted, provide the hibiscus with proper care.
- Watering: Keep the soil moist but not soggy. Water whenever the top inch of the soil feels dry.
- Light: Place the plant in a bright location with plenty of indirect sunlight.
- Fertilizing: After a few weeks, fertilize the plant with a balanced fertilizer to encourage growth.
Troubleshooting Common Issues
Root Rot

If your cutting develops slimy, brown roots, it may be experiencing root rot, usually caused by stagnant water or excess moisture. To remedy this, change the water frequently and ensure sufficient light for your cutting.
Wilting Leaves
If the leaves begin to wilt after transplanting, it may be a sign of transplant shock or underwatering. Ensure you adjust watering practices and provide some shade until the plant acclimates.
Inadequate Root Development
Slow or poor root development could result from insufficient light or water. Make sure your cutting gets plenty of indirect sunlight, and that the water is refreshed regularly.
Frequently Asked Questions (FAQs)
1. Can I propagate hibiscus in soil instead of water?
Yes, hibiscus can be propagated in soil. However, water propagation allows for easier observation of root growth and tends to be simpler for beginners.
2. How often should I change the water during propagation?
Change the water every week to keep it fresh and prevent algae growth. Always ensure the cutting has adequate water levels.
3. What time of year is best for hibiscus propagation?
The best time to propagate hibiscus is during spring or early summer when the plant is actively growing.

4. How long does it take for roots to develop?
Root development can vary but typically takes 2-4 weeks. Factors such as temperature, light, and water conditions impact this timeframe.
5. Can I use tap water for propagation?
Yes, tap water can be used, but it’s better to let it sit for 24 hours before using it to allow chlorine to dissipate.
6. What should I do if my cutting doesn’t develop roots?
If roots don’t develop, ensure you’re providing sufficient light, clean water, and correct humidity. You can also consider starting with a new cutting if the first doesn’t take.
7. How can I increase the success rate of propagation?
To enhance your success rate, ensure your cutting is healthy, give it the right light conditions, and change the water regularly. Using rooting hormone can also be beneficial.
Conclusion
Hibiscus plant propagation in water is not only a rewarding gardening endeavor but also a great way to expand your plant collection. By following these simple steps and providing your cuttings with the care they need, you can enjoy the beauty of hibiscus flowers in your home or garden. With patience and attention, you’ll soon have a thriving hibiscus plant, showcasing your green thumb. Happy propagating!